Topic: Militaria

Two unidentified snipers, in "ghillie" suits, of the 1st Canadian Parachute Battalion during an inspection by King George VI, Queen Elizabeth and Princess Elizabeth, Salisbury Plain, England, 17 May 1944. Photographer: Elmer R. Bonter. Mikan Number: 3298173.
From the Library and Archives Canada virtual exhibit "Faces of War."
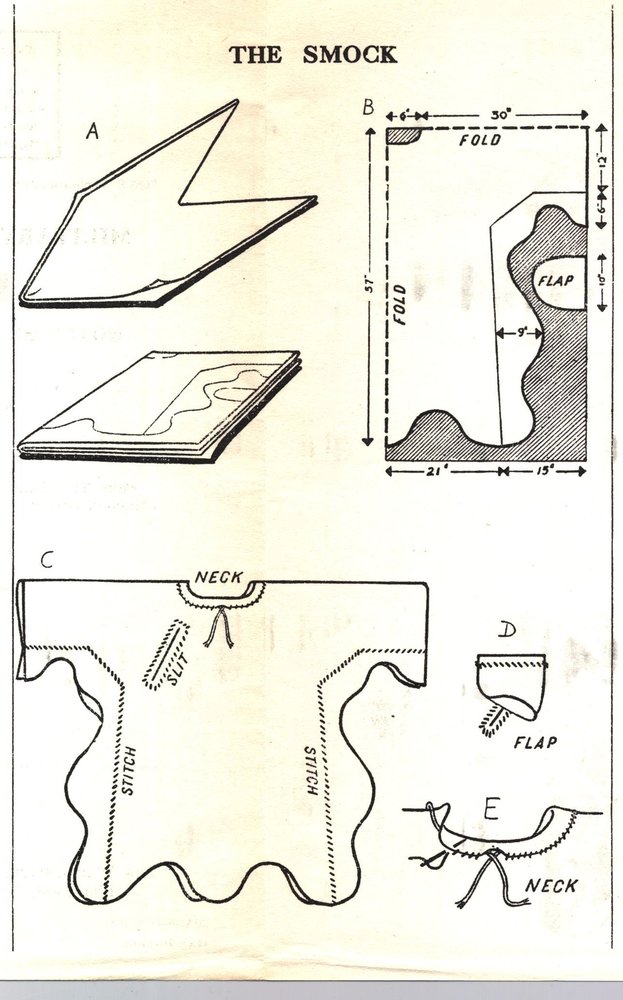
Sketches A to E

Sketches F and G
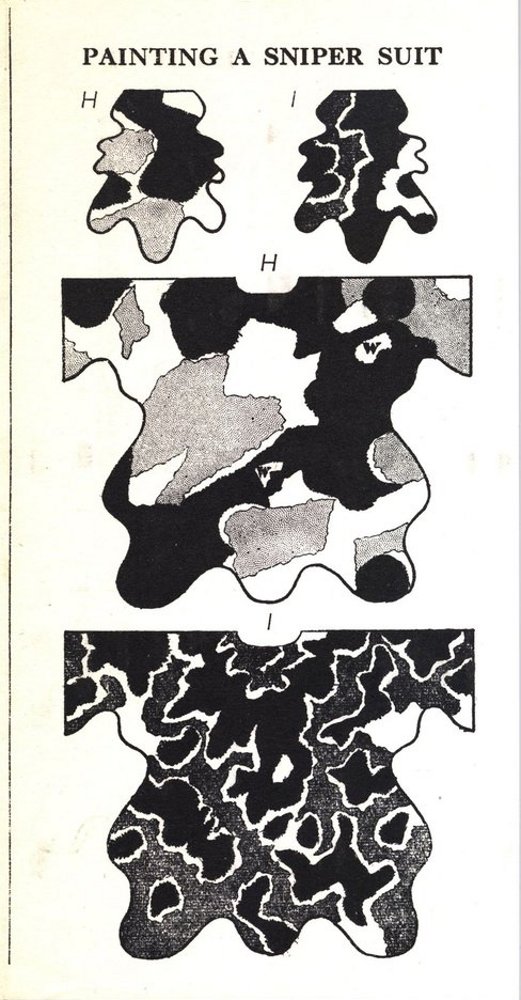
Sketches H and I
Military Training Pamphlet No. 44
Notes on the Training of Snipers
Amendments (No. 1)
Appendix 9
A Home Made Sniper Suit
This sniper's suit is made in two pieces, a loose smock with flaps which break the sniper's form in any position, and a hood with flaps which breaks the outline of the head and shoulders. This hood can be worn independently.
To make the smock—Material: Rough hessian canvas (8-10 ozs.) or latrine canvas, sackings or sandbags sewn together. Fold a 6 ft. by 10 ft. piece as Sketch A and chalk out design as on Sketch B, making sure that folds are on the correct sides. Cut away the shaded area and lay the piece out as Sketch C. Stitch front and back together along the dotted lines with stout thread.
The dimensions shown in the chart are for a large man.
Neck—Turn over a 1-inch hem round the neck and stitch down after inserting cord as in Sketch E.
Flap—Run a line of stitching round slit to prevent fraying. Stitch flap to hang over a bit as in Sketch D.
To make the hood—Fold a piece of hessian 3 ft. by 5 ft. as for the smock, and chalk out design as in Sketch F. Cut away the shaded area and lay the piece out as in Sketch G. Stitch the back and front together with strong thread.
Eye apeture—Place hood over head and chalk an oblong, approx. 6 in. by 1 1//2 in., in front of the eyes—Sketch G. Cut all cross threads and sides and alternate threads along top and bottom of the oblong—and pull cross threads out.
Painting—Use any matte paint. When applying paint leave rough edges; coloured areas need not meet exactly as a gap between colours increases disruptive effect. Areas of natural hessian can be left unpainted. Suitable colours for painting—standard camouflage colours: Dark Colours—1a, very dark brown; 6a, dark green. Mid-tones— 9 or 7, mid-green; 2 to 5, warm grey or light earth. Design I is suited to hedge, field and parkland. Design II to rocks, earth or sandbags.
These disruptive patterns are only intended to be used as guides. Pattern and colour must fit the local background.

